
 Apr 16 2021
  Apr 19 2021
  May 05 2021
  May 07 2021
  May 15 2021
 © 2022 All rights reserved Worktop Library
By: Alan
May 17, 2021
0 Comments
Have you ever wondered how to install a granite kitchen worktop? We provide you with step-by-step instructions here.
WHAT YOU WILL LEARN
This ten-part guideline will arm you with a granite worktop installation system to create the kitchen you dream of whilst saving costs.
STEP 1: Plan your granite installation
- How to check that your kitchen is ready to receive granite
- Step by step on what to do before you even start installing your chosen granite
- Choosing your type of granite and edge profile
- How to make allowances on walls, bends and wall columns
- How to ensure that your granite surface has appropriate support
STEP 2: How to measure a granite worktop
- The main principles of preparing your kitchen to receive the stone
- Checking kitchen cabinets and Mistakes you need to avoid
- Why you need to make allowances when measuring up
- Why all cabinets and carcasses must be complete, level and fixed to the wall
- Why shouldn’t you make alterations or additions after measuring up.
STEP 3: Make a template for your granite worktop
- Learn the exact method our professional worktop installers follow to achieve your desired kitchen countertop.
- Learn what the best materials to use as a worktop template
- The golden rules of creating a good template
- The biggest mistakes nearly all individuals make when trying to measure up
- Taking into account cutouts, edging and other kitchen worktop features
STEP 4: Getting ready for your granite worktop Installation
- Why you must disconnect all appliances before your stone kitchen worktops installation.
- Why you need to decorate AFTER installation.
- Worst mistakes that 98% of people make when preparing for an installation
STEP 5: Transporting and delivery of your granite worktops
- How to secure & bulletproof your granite during transport.
- Know how to protect your worktop edges from chipping and other damage.
- How to handle granite surfaces when installing kitchen worktops.
STEP 6: Installing your worktops
- How to ensure a precise fit
- The most fragile surface areas to take into account when lifting your stone countertops
- Hot to make adjustments while fitting granite kitchen worktops
STEP 7: Jointing the granite panels
- How to snap joints together
- How to ensure your worktop joints fit flush
- Why do you need to spend 30 Minutes butt jointing your new work surfaces
STEP 8: Fixing your worktops to the cabinets
- How attaching the stone to the cabinets will change your entire stone fitting
- What type of glue you need to use
- Why is it not a good idea to use caulk when glueing your surfaces
STEP 9: Applying a sealant to your granite worktop installation
- How to apply a sealant to your natural stone countertop
- What type of sealant you need to use, and where you can find a good-quality sealant
STEP 10: Maintaining your granite worktops
- Type of cleaners you need to use for natural stone
- Things you should avoid doing on your new granite worktops
- How to clean your granite worktops
- How to protect your worktops from thermal shock
Step 1: Planning your granite worktop installation.
Working with your worktop supplier is critical.
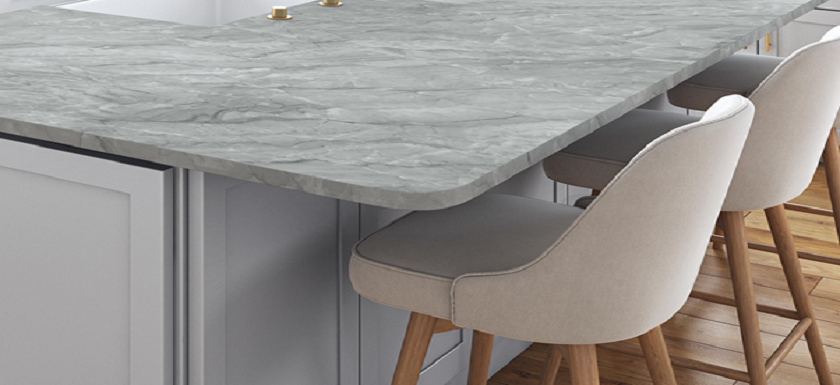
Granite is heavy and difficult to transport, requiring special cutting tools. And while it is known for its toughness, if not handled properly or installed with appropriate support, it can crack or, even worse, break. There are some fixes for a broken granite slab. Therefore, we recommend working alongside a professional worktop supplier. Firstly, decide what type of granite worktop you want. Online stores offer a lot of samples and a wide variety of slabs. You’ll see all the various colours and grain patterns up close for the Kitchen.
residential kitchen is typically equipped with a stove, a sink with hot and cold running water, a refrigerator, and worktops and kitchen cabinets arranged
You’ll also see the various edge profiles: a pencil edge, bevel, square, bullnose, mitre, ogee, and many more. You may prefer for the manufacturer to visit your home. They will check if items such as columns or exposed pipes may affect how they make the kitchen worktops. You must include the length of the worktop overhang whilst taking a template. And the type and size of the kitchen splashback besides the main worktop surface.
Step 2: How to measure a granite worktop
Once you have selected your granite and removed your old stone kitchen worktops, take precise measurements of your base cabinets. In like manner, you can start with the base cabinets’ worktops.
You must measure the distance between the front of the frame and the end of the wall. Similarly, it would be best if you did the same across the entire length of the cabinets. Ensure that the cabinets are level, screwed to the walls and floors. It is essential, especially for kitchen worktops London, mainly due to space limitations. If you fabricate your worktops and make adjustments after this process, you may find that your worktops are too big or too small.

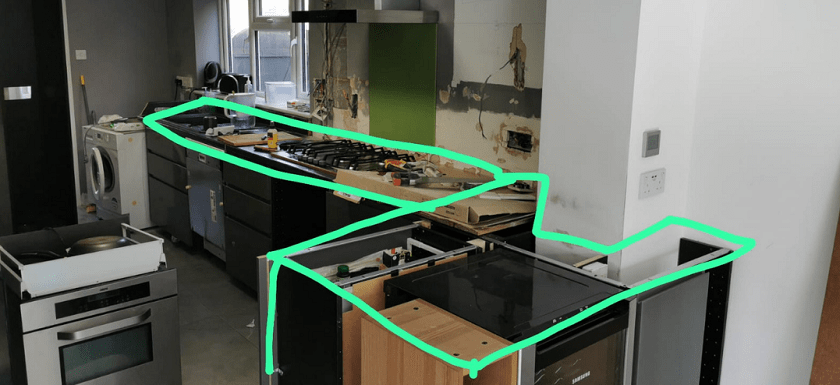
Step 3: Make a template for your granite worktop
The best way to take dimensions for your stone fabricator is to make a cardboard or Mylar plastic template. Correx, the brand name for a twin-walled extruded polypropylene sheet, is the favourite of many professional worktop companies.
Write the template to fit snugly against the wall along the entire length of a series of cabinets before tracing the front edge of the template.
You need to measure the exact locations of the cutouts for sinks and worktops and the holes for the tap and soap dispenser on your template. Be careful not to leave more than sixty centimetres’ space between cabinets, such as a span over a dishwasher. Do not allow anything over twenty-five centimetres of unsupported overhang with 20 millimetres thick stone and thirty centimetres for 30 millimetres thick granite.
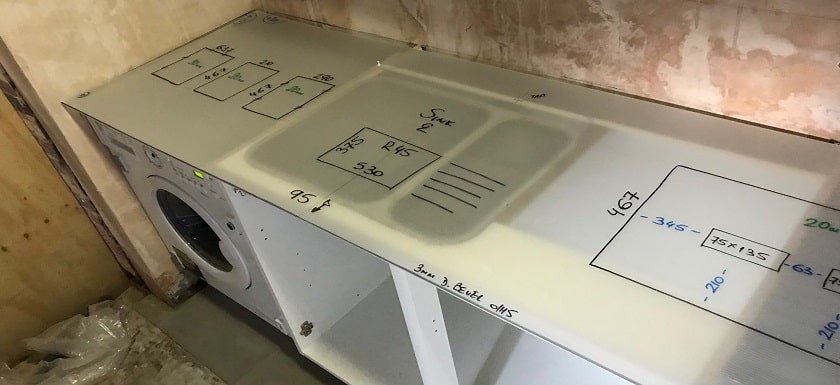
It would help if you also made notes when templating for an under-mounted sink. This way, the fabricator will know to cut a groove along the bottom edge of the sink cutout whilst securing the sink’s clips.
In addition, you can ask your granite worktop supplier to reinforce the trimmings with steel or fibreglass reinforcements to strengthen tight areas around them. Remember, if you feel more comfortable, you can always ask for a quote from your worktop company to come and take measurements themselves to ensure accuracy.
Once you have specified your requirements and submitted your measurements, set a date to collect or arrange the installation of your worktops.
Make sure your base cabinets are level throughout their length. If not, loosen the base units and level them with shims under the base plate. Loose cabinets may result in uneven or cracked kitchen worktops due to inappropriate support for the stone.
Step 4: Getting ready for your granite worktop installation
It is not always good to use packers directly under your granite worktops. These can create tiny gaps that could get your granite to break when pressure is applied to its surface. Make sure to disconnect your hob, sink and taps before the granite installation.
Also, ensure that any decorative work or additional tiling occurs after your worktop installation. If you paint your walls before it, you’ll find that you will need to re-paint the areas surrounding the worktop, as the weight of the stone can cause some damage to walls and corners during installation.
Step 5: Transporting and delivery of your granite worktops
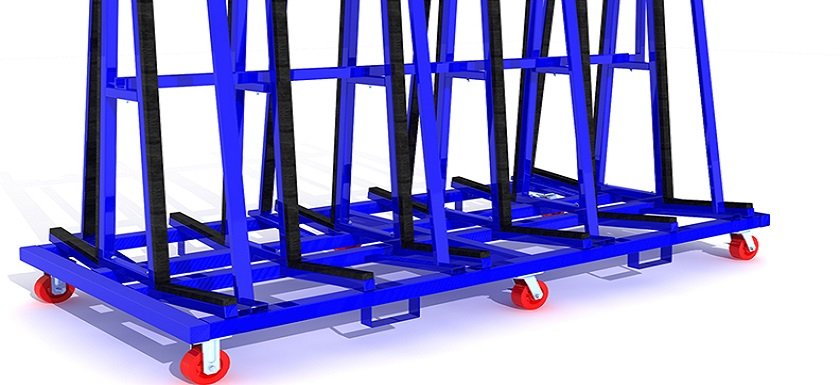
It is always essential to carry the worktop surfaces vertically, never horizontally flat. It avoids cracking or breaking the stone. To transport granite slabs, take them to the edge of A-frame support, like those seen for glass panels. If necessary, you can make a rack. Protect the edges by covering them with strong adhesive tape. It will avoid chipping if there are bumps on the road during transport.
Now that you’ve given the templated dimensions and levelled your cabinets, it’s time to bring home the safely cut worktops, which can be tricky.
Unless you request delivery, you’ll need to pick up the worktops from the stone factory only once they are ready.
Remember that granite is heavy – a 2 ‘x 6’ countertop can weigh over 400 pounds – so ask for help transporting and moving counters safely. When the tiles arrive, have a clear space ready in the kitchen area to store them upright until you are prepared to install them. If you use tiles for the walls, keep these aside for installation after the kitchen worktop.
Step 6: Installing your worktops
Once you have the granite worktops on-site, you can install them. First, dry-fit the work surface, ensuring a precise fit.
Hold the granite in its most fragile areas when lifting the counter, like along the sink, hob, or socket cutouts.
Place slabs directly on the frames of the lower cabinet. The granite does not need to be supported by additional support, as seen with solid plywood.
If the wall-facing edge of a countertop is not flush and requires adjustment, carefully mark all areas of the worktop that you want to remove and move these down slowly.
Then, using a dry-cutting diamond blade connected to an electric grinder, carefully shave the edge to the desired level, and always wear protective goggles to protect against dust and sand particles.
Then route back the worktops in place, ensuring that all edges are tight and secure, including joints between panels, should you have more than one.
Step 7: Jointing the granite panels
If you have multiple granite worktop panels, once the granite surfaces are flush and level with the cabinets, it is time to snap them together.
First, tape the edges to protect them. Join the butt joints with two-part epoxy of the same colour you can buy at the stone company.
Tighten all screws until you feel resistance. Attach and turn on the automatic pump – the tension created will ensure that the jointed edges remain flush as the epoxy dries. A joint setter also ensures that the top edges of the seams remain aligned with each other.

When the epoxy is dry, after about an hour, remove the joint setter. Next, carefully shave any excess epoxy with a vertically held single-edge blade. Do not hold the shaver at an angle, or you may damage the epoxy resin. And remember to apply strokes evenly.
Step 8: Fixing your worktops to the cabinets
Now that you have installed the jointed worktops, securing the stone to the cabinets is time. The countertops’ weight is almost enough to hold the stone in place, but you’ll still want to put a caulk or a spot of silicone along the bottom perimeter of the counter, where the granite meets the top of the cabinet. Do not use silicone caulk; Over time, silicone caulk could penetrate the stone and cause staining. Instead, use acrylic-based silicone. After applying a few silicone spots, leave the tops resting for fifteen to twenty minutes.
Step 9: Applying a sealant to your granite worktop installation
Once your installation is complete, finish by applying granite sealer to your kitchen worktops. It will protect the stone and prevent deep staining. You can find professional granite sealants online at low prices. Avoid buying low-quality sealants, as these may react adversely and alter your stone surface colour. You can use a sealant made in Europe.

Countries like Italy or Germany are significant producers of kitchen products and make the best quality stone sealants. Once you have applied the sealant, wipe it evenly with a clean, soft cloth, ensuring you get full surface coverage. Stone sealants generally smell similar to nail varnish. Allow drying for 24 hours.
Step 10: Maintaining your granite worktops
Clean your new worktops using Ph balanced cleaners, which you can buy at most online stone stores. This speciality cleaner will leave no residue and keep your granite countertops shiny and new.
Please do not stand on your kitchen worktops, which may crack or break. Avoid applying excessive weight around the worktop cutouts. We mentioned earlier that these are the most fragile areas of fabricated granite surfaces.
If you need to decorate after installing your worktops, ensure these are covered to avoid scratching by tools and stains from paint.
When cleaning your granite worktop, use a microfiber cloth and water to clean your surface for maximum cleaning results. Because granite is a porous natural stone, we don’t recommend using abrasive products or generic chemicals when cleaning. When unsure about using a particular product, test it on the corner of the worktops before applying it to visible areas.
Even though granite has a naturally cool temperature feel, it is not impervious to extreme temperatures. Place a trivet under each one before setting them down on your worktops when using hot pots and pans from the oven.
You can watch the video below, which explains the process of getting kitchen worktops:
Installing a granite worktop on your own is challenging, but the cost and upgrade to your kitchen are well worth it. However, if you are in doubt, we recommend contacting our team of experienced stonemasons and fitters.
Source: DIY Network
Author:

Alan Nussbaum
Meet Alan Nussbaum, our Sales and Marketing Manager. With almost two decades of experience, Alan’s impressive track record includes creating one of the first online stone companies in 2012 and pioneering the acceptance of cryptocurrencies in construction in 2018 before co-founding The Worktop Library with Maria.
Alan’s work is featured in numerous Stone and Home Decor magazines. In addition, he collaborates with the industry’s leading stone brands, cementing his reputation as an innovator.
Before starting a thriving career in the stone industry, Alan honed his skills by overseeing luxury fashion brands such as Burberry, Matches Fashion, and Patrick Cox. With his unique blend of experience and expertise, Alan is a true trailblazer in the stone worktop industry. His passion for delivering exceptional service is evident in every aspect of his work.